


The program allows you to use almost any application with proxy servers, even if those applications do not support proxies natively.
What is Proxifier
Proxifier was developed by Initex Software in 2011. It is based in the United States and has offices in Russia, Ukraine, and Germany. Proxifier is available for Windows, Mac OS X, and Linux operating systems.
Proxifier is literally the most powerful and most functional program for implementing support for proxy connections even for those programs that do not initially support work through a proxy server.
While Proxifier’s competitors, such as Proxycap, FreeCap, SocksCap, Wide Cap, etc. are either no longer supported by their creators or require additional patches or in-depth knowledge of network protocols, Proxifier is accessible and easy to understand. It works out of the box on any common operating system.
The Demo Version of Proxifier
The Proxifier free 31-day demo version is available for download on the official Proxifier website. The demo version is a fully functional version of the software that allows you to try the features of Proxifier for a limited period of time. However, the demo version is not the full version and does not include all of the features. Additionally, the demo version is limited to a maximum of 5 connections. After the demo period expires, the software will no longer function.
Other limitations of the demo version of Proxifier include the fact that it cannot be used to create secure tunnels, and the usage of profiles is limited to a maximum of 10. The number of rules that can be created is also limited to 10 and the number of proxies that can be used is limited to 3. Additionally, the logging and statistics functions are disabled, as is the ability to check for updates. Finally, the demo version cannot be used for any commercial purposes.
We used the full version of Proxifier to write this manual.
Proxifier Basic Features
With Proxifier, you can accomplish the following tasks effortlessly:
- Run any program via a proxy server without any additional configuration.
- Use the internet from any network that is restricted.
- Bypass firewall restrictions with ease.
- Route all network connections, including system connections, to flow through a proxy server by tunnelling the entire system.
- Use a proxy server to resolve DNS names.
- Create your own Proxification Rules to adjust your connection.
- Maintain privacy by hiding your IP address.
- Create proxy chains using diverse protocols.
- View real-time information on current network activities and maintain log files.
- Receive comprehensive reports regarding network errors.
- etc
Proxifier supports all major proxy protocols such as SOCKS 4, 4a, 5, HTTP/HTTPS, IPv4 and IPv6.
It can work with proxy servers that require authentication by IP-address, as well as authorization by Username and Password.
You can use almost any proxy to work with Proxifier, be it a free proxy, a mobile proxy, a residential proxy or a datacenter proxy.
In this tutorial we’ll show you which settings you need to do to work with Proxifier by using a data center hosted IPv4 SOCKS5 proxy powered by our proxy service authenticated by IP-address.
Step-by-step Guide to Setting Up a Proxy Server in Proxifier
As Proxifier has a lot of different functions and full description of them will take a huge amount of time, we will focus on the most basic functions of Proxifier, such as
– Proxifier setup for full forwarding of all connections through the proxy server;
– Proxifier setup for partial traffic transfer of selected programs through the proxy server;
– Setting the Proxifier for accessing or blocking of selected sites through the proxy server;
and describe them in detail in this manual.
Setting Up a Proxy Server in Proxifier
The first thing you must do to work with Proxifier is to add a new proxy server. To make this happen, do the following:
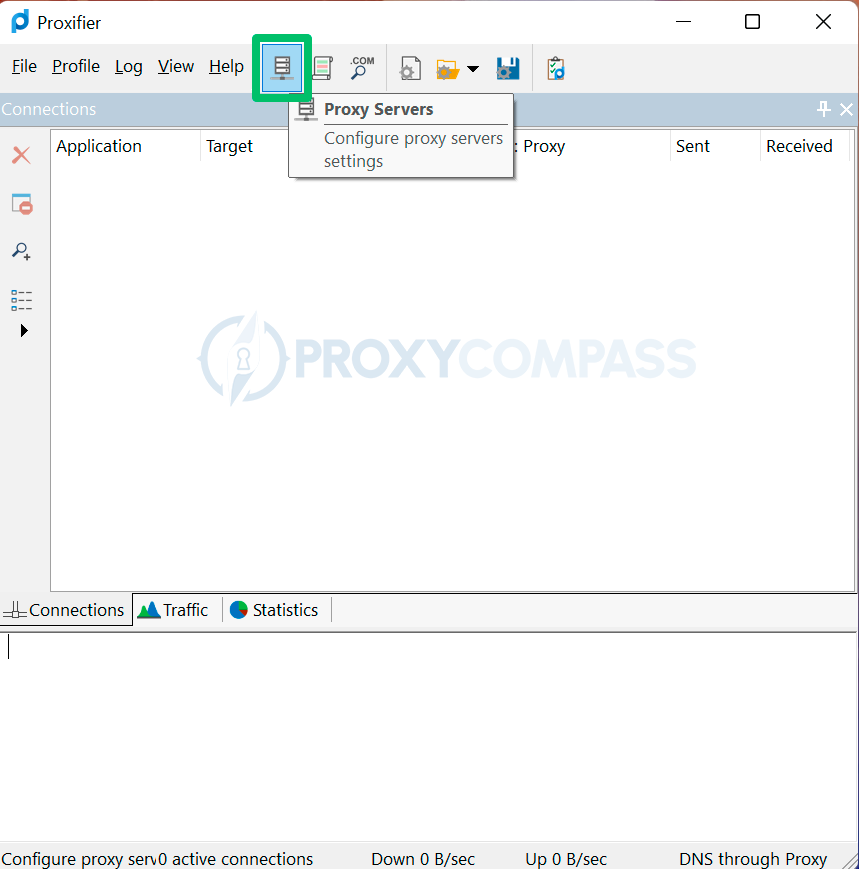
- Launch Proxifier.
- Click on the icon with the proxy server as shown in the screenshot below or click on the menu item “Profile” and then on “Proxy Servers…“.
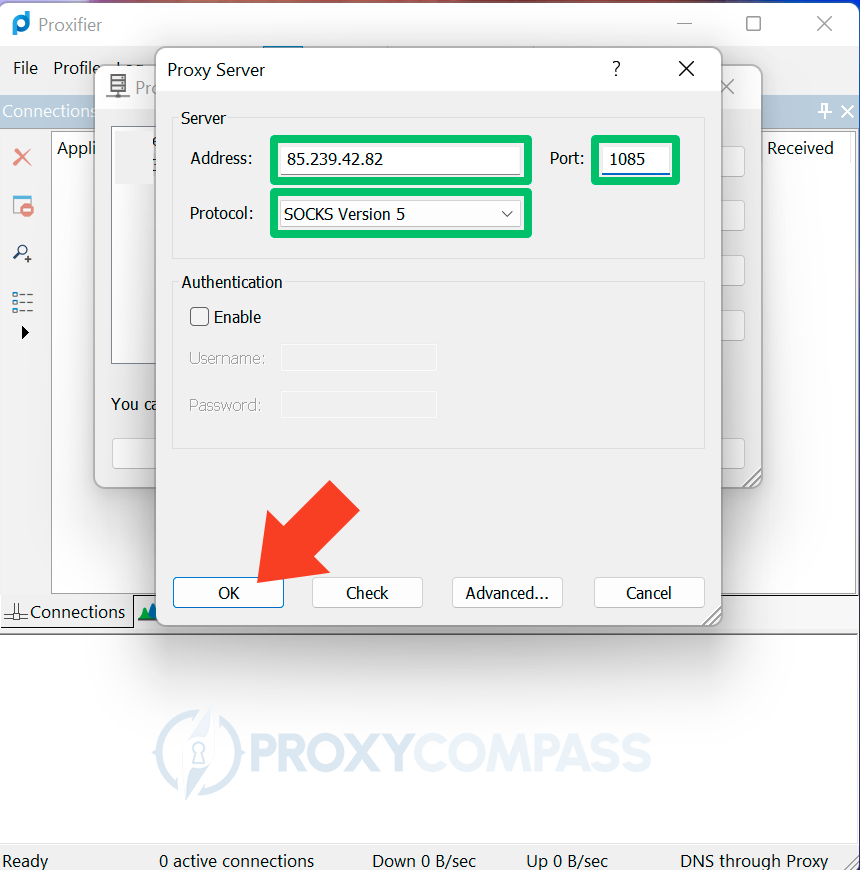
- In the window that appears in the “Address:” field enter the IP address of the proxy server, and in the “Port” field enter the port number of the proxy server.
- In the “Protocol:” drop-down menu, select “SOCKS Version 5“.
- Click on “OK” to save your settings.
If you have the option of selecting a proxy protocol, we recommend that you always choose SOCKS5. HTTP or HTTPS protocols are also supported by Proxifier, but require additional configuration.
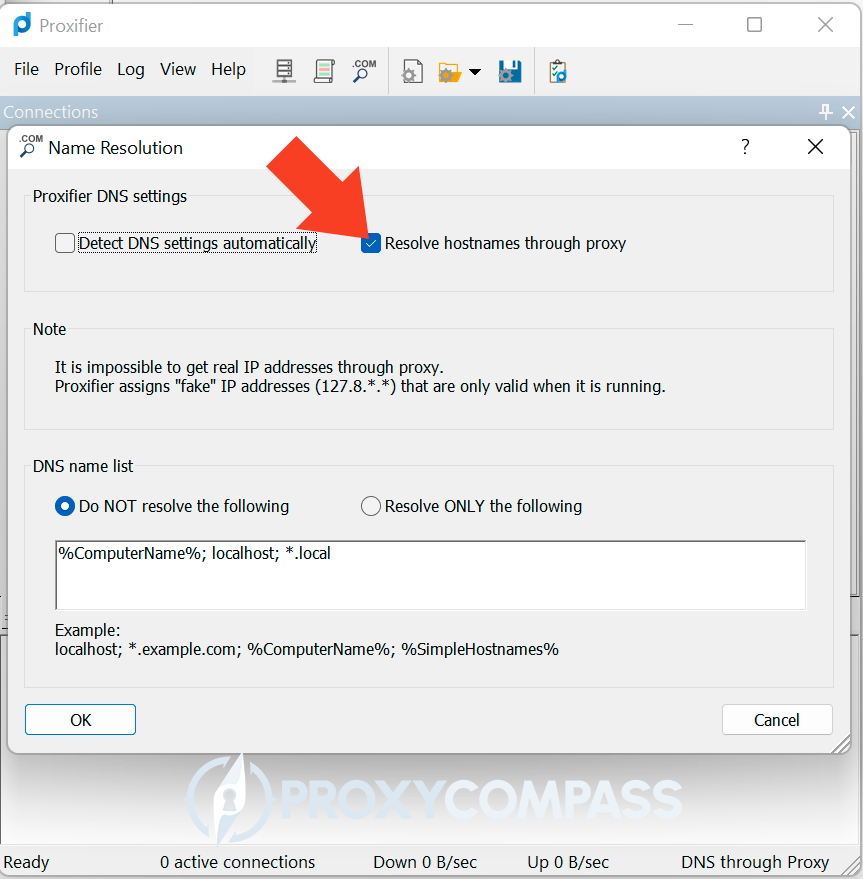
SOCKS5, unlike SOCKS4, allows you to resolve hostnames through a proxy server. By enabling this feature, you will increase your anonymity one level higher.
To activate this feature, click on “Profile” in the Proxifier menu and go to “Name Resolution…“.
In the window that appears, activate the “Resolve hostnames through proxy” option.
Now after you have successfully added a new proxy server, check its functionality this way.
Click again on the proxy server icon as shown in the first screenshot and then click on the “Check…” button in the window that appears.
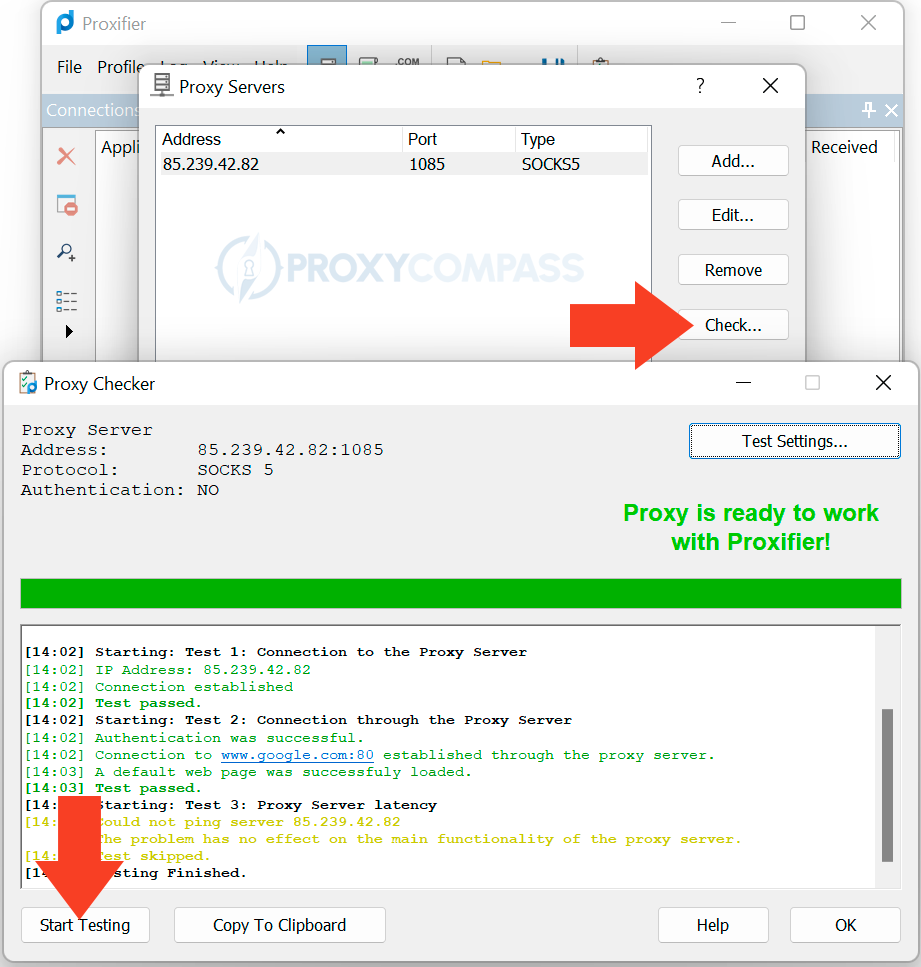
If you see the green “Proxy is ready to work with Proxifier!” – everything is fine.
If not, check again the IP of the proxy, its port and the specified protocol.
For ProxyCompass users:
make sure that you enter the correct IP address of your computer in the “Binding IP” field in the control panel.
Setting Up Proxifier for All Network Connections
To make all network connections from your computer go through a proxy server, do the following.
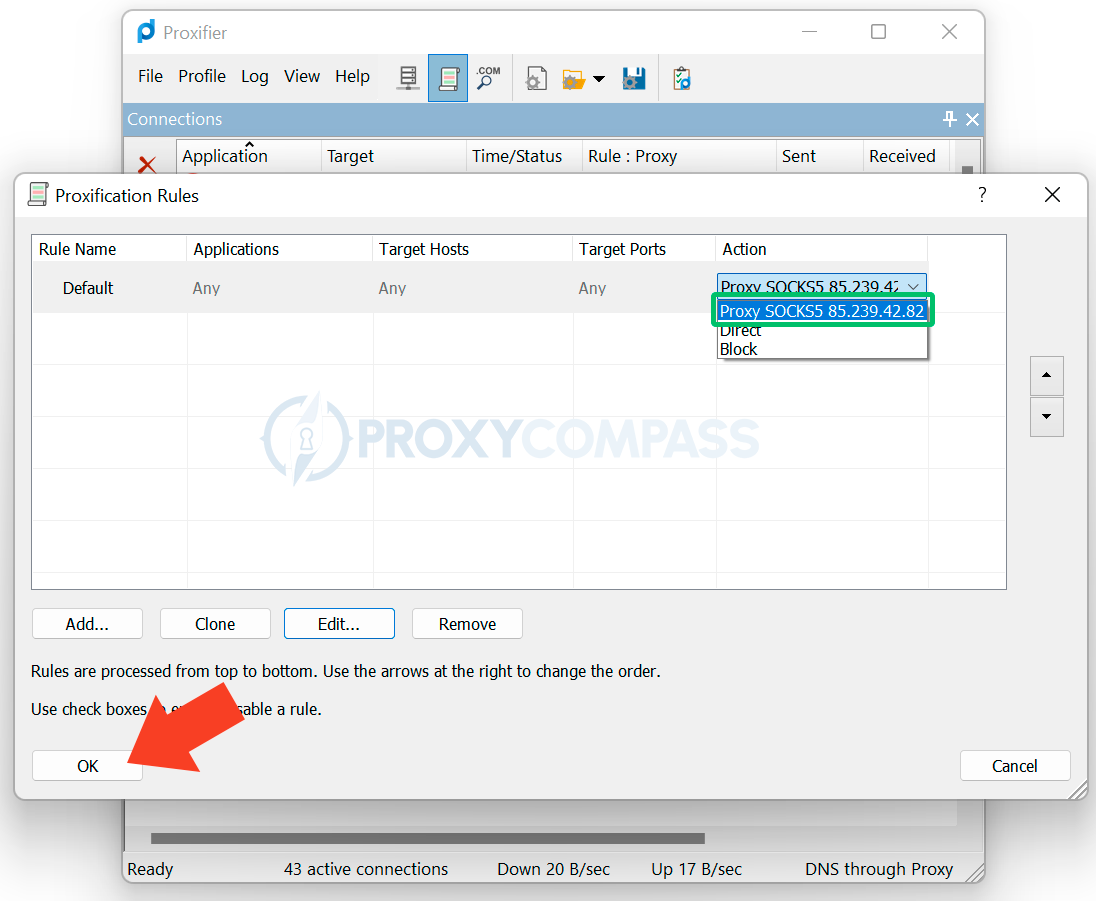
Click on the “Proxification Rules” icon or on the “Profile” menu item and then on “Proxification Rules” and you will see a single “Default” rule in the window that appears.
In the “Action” drop-down menu you will see three possible options:
- “Direct“
- “Block“
- “Your Proxy IP“, which in our example is “Proxy SOCKS5 85.239.42.82“.
To have all your traffic go through a proxy server, select the option with your proxy server.
Don’t forget to restart all applications that have worked up to this point so that they start working through the proxy server.
To make sure that the new rules are in effect, open the IP identification page in any web browser and check the results.
Basically, if you have done everything as described, all your applications now work through a proxy server.
However, if there is such a possibility, we recommend to use the built-in proxy server function in particularly sensitive applications, such as messengers, torrent clients, etc.
Setting up Proxifier for a Specific Program
Proxifier allows you to make only your chosen applications use a proxy server while all other programs work directly, i.e. using your real IP address.
To make a certain program work through a proxy, you need to do the following.
For example, you want Opera to work through a proxy, but you want Firefox and Chrome to continue working directly from your real IP address.
To do this, we need to create a separate proxy rule for Opera.
Go to the Proxifier menu by clicking on “Profile” and then on “Proxification Rules” and create a new rule by clicking “Add“.
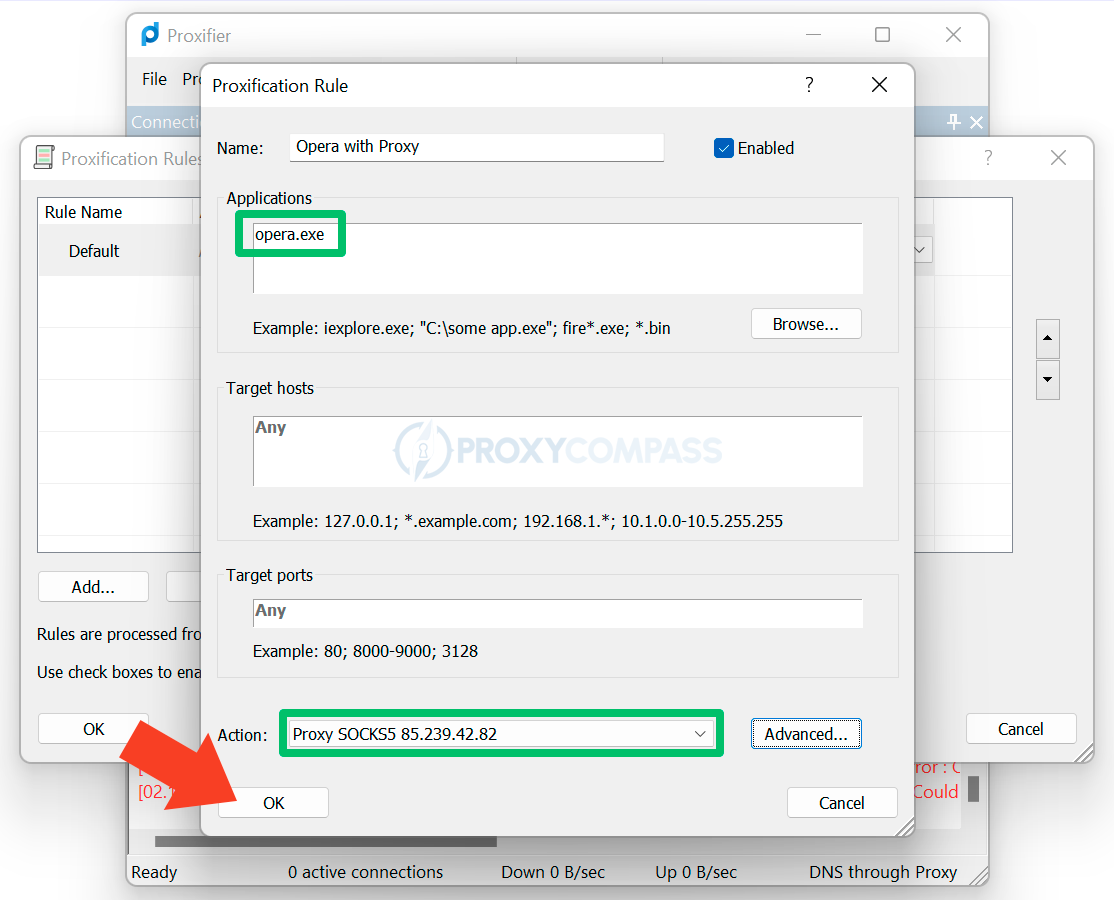
In the window that appears, enter the name of the new rule in the “Name:” field. Let’s name this rule something like “Opera with Proxy“.
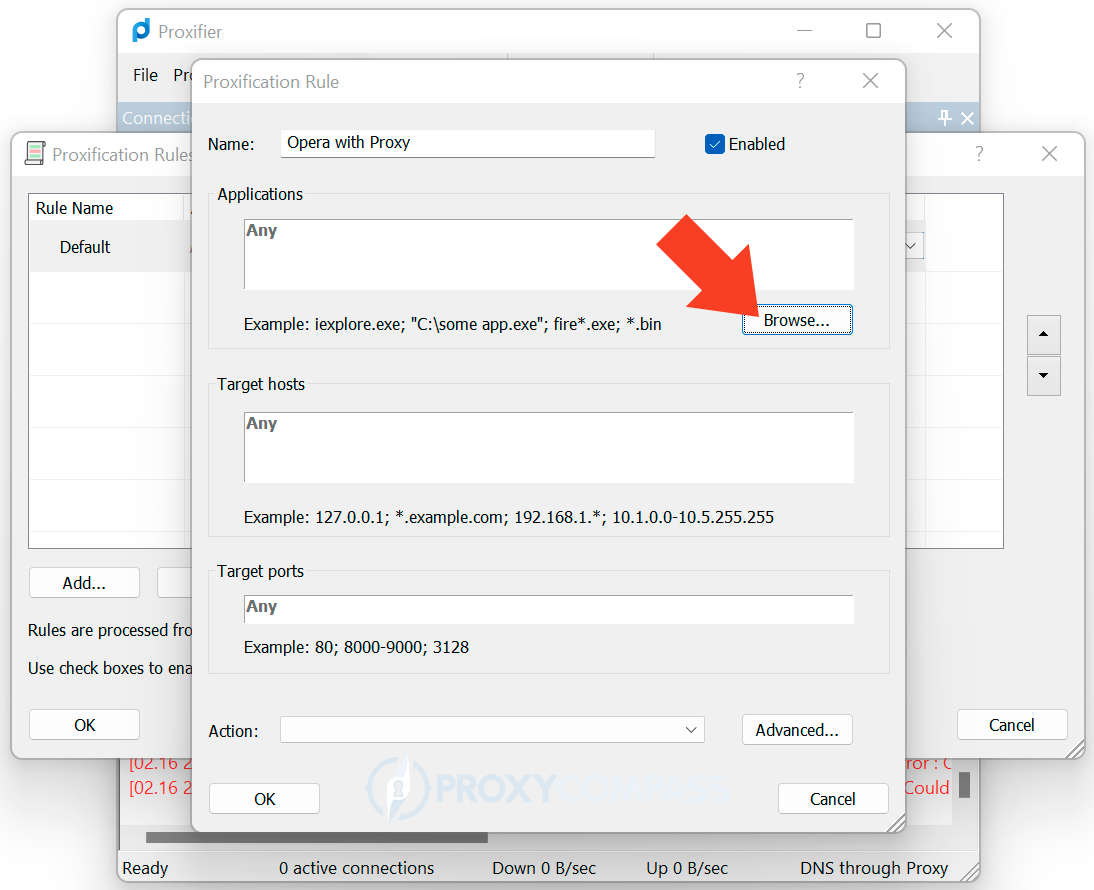
To select an executable opera.exe file, click on the “Browse…” button and find it in its folder.
In our case, the file is located here C:UsersAdminAppDataLocalProgramsOpera
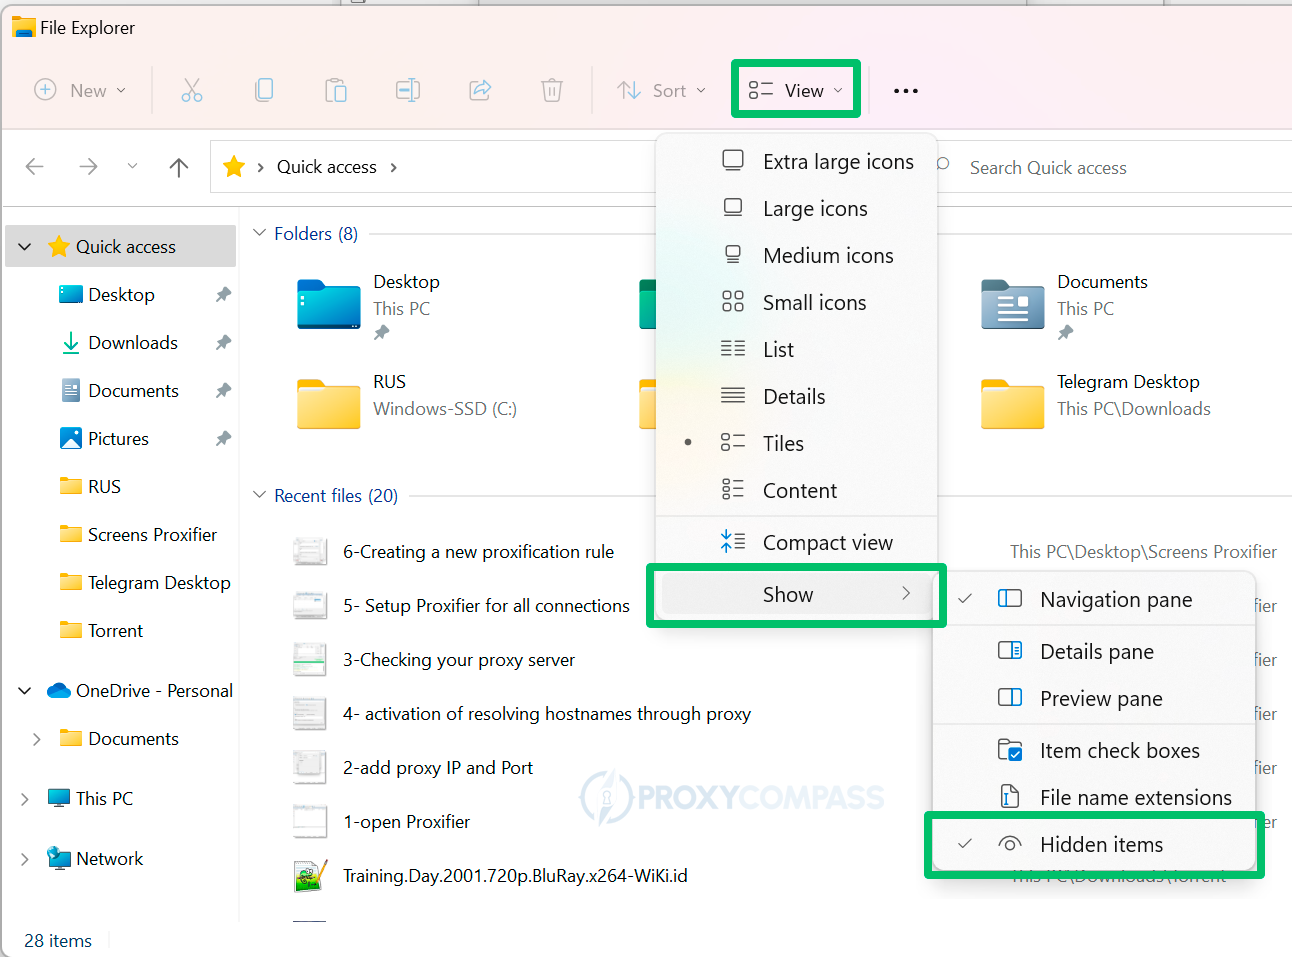
In your case, it may be in another location. Most likely, you won’t be able to find the executable file because it, like all other system files, is hidden by default.
To make hidden files visible, for example on Windows 11, do the following:
- Open File Explorer from the taskbar.
- Select View > Show > Hidden items.
- Done
After that you can easily find the executable file. Select opera.exe. It will appear in the “Application” window. At the very bottom of the “Action…” drop-down list, select your proxy and click “OK”.
To make sure that the new rule has taken effect, open the IP detection page in Opera and any other browser. Voila, the new rule is working!
Setting Up Proxifier for Selected Websites
If you want to visit a particular site through a proxy, but all other sites without using a proxy, then this method is for you.
This method is essentially a follow-up to the previous one. The only thing you need to do is to add to the existing proxification rule the necessary site addresses, or IP addresses in the “Target hosts” field.
Suppose you have gone abroad, but you do not want your foreign IP address to be visible in social networks or you don’t want to be blocked by your bank when you try to log into online banking with the IP of another country.
In this case, you can find a proxy server with the IP address of the country you need, install the Proxifier, create a proxification rule and add the addresses of the websites you need.
Simply list the required addresses in a column, separated by semicolons in the field “Target hosts“. For example, like this:
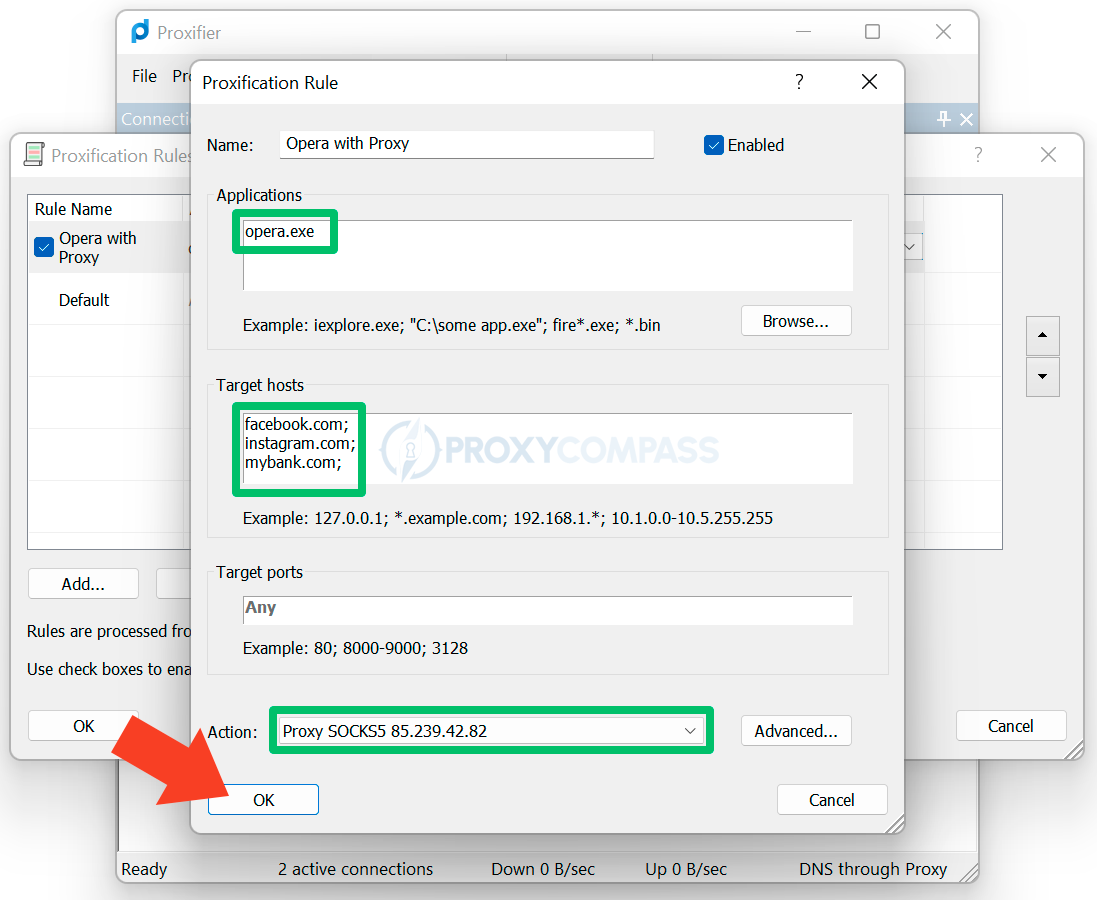
From now on, as soon as you start Opera and go to any of the sites specified in the rule, the connection will be through a proxy. In all other cases, a direct connection using your real IP address will be used.
You can also do the opposite. For example, you can set up the Proxifier so that your children won’t be able to go to the sites you specify. Just specify the banned sites in the rule and set “Action” in “Block” position. Don’t worry, your kids won’t be able to browse adult content.
As you can see, Proxifier is the most powerful tool for managing proxy servers.
Happy and secure browsing with Proxifier!
