What is the ClonBrowser?
ClonBrowser is a versatile virtual browser that excels in privacy and multi-account management. It’s designed to manage multiple profiles simultaneously, providing each with a unique, virtual browsing environment to ensure privacy and security. This is achieved through advanced fingerprint protection, which masks your real browser fingerprint using sophisticated algorithms.
The browser supports the setup of diverse proxy configurations and is compatible with major proxy providers, enhancing its utility for users needing to manage multiple accounts across different regions or platforms. This makes it particularly useful for tasks like social media management, affiliate marketing, and digital advertising, where multiple, distinct online identities or profiles are necessary.

ClonBrowser also offers robust team collaboration tools, allowing users to share profiles and manage tasks collectively without compromising security or efficiency.
Why You Should Use Proxies with ClonBrowser?
Using proxies with ClonBrowser is crucial for several reasons, especially when managing multiple social media profiles for monetization purposes:
- Account Security and Anonymity: Proxies help mask your actual IP address, making it more difficult for platforms to associate and link the multiple accounts you manage with one another. This reduces the risk of account bans or restrictions, which is vital when you are handling numerous profiles for marketing or business activities.
- Geolocation Flexibility: Proxies allow you to access the internet from different geographical locations. This is particularly useful for social media strategies where content needs to be tailored and appear local to specific audiences. It also helps in bypassing geo-restrictions and accessing content or functionalities limited to certain regions.
- Simultaneous Operations: By using proxies, ClonBrowser can perform tasks across multiple accounts at once without triggering security protocols that detect and block suspicious activities from a single IP address. This is essential for efficient operation across various platforms, allowing for mass actions like posting, liking, or commenting.
- Improved Performance: Some proxies offer faster connection speeds and improved reliability when accessing servers from distant locations, ensuring smoother operation of the ClonBrowser, especially when handling high data loads.
- Enhanced Privacy Controls: Proxies in conjunction with ClonBrowser’s anti-detect features provide a robust defense against tracking and fingerprinting techniques. This protects the privacy of the user and the integrity of their marketing strategies.
Using proxies in ClonBrowser ultimately supports the scalability and safety of digital marketing and social media management, enabling users to maximize their productivity and profitability without compromising security.
Setting Up a Proxy in the ClonBrowser
ClonBrowser offers comprehensive support for all recognized proxy server types and protocols.
In this guide, we’ll walk you through the steps to configure rotating and static proxies, as well as how to bulk upload your proxy list into ClonBrowser.
It’s important to note that there are two primary proxy protocols: SOCKS, including versions 4 and 5, and HTTP, along with its secure variant HTTPS.
In this article, we’ll focus on using SOCKS5 due to its superior anonymity features. However, the method for setting up the quicker HTTP/HTTPS proxy protocol is similar and straightforward.
Step 1: Add a Single Proxy IP
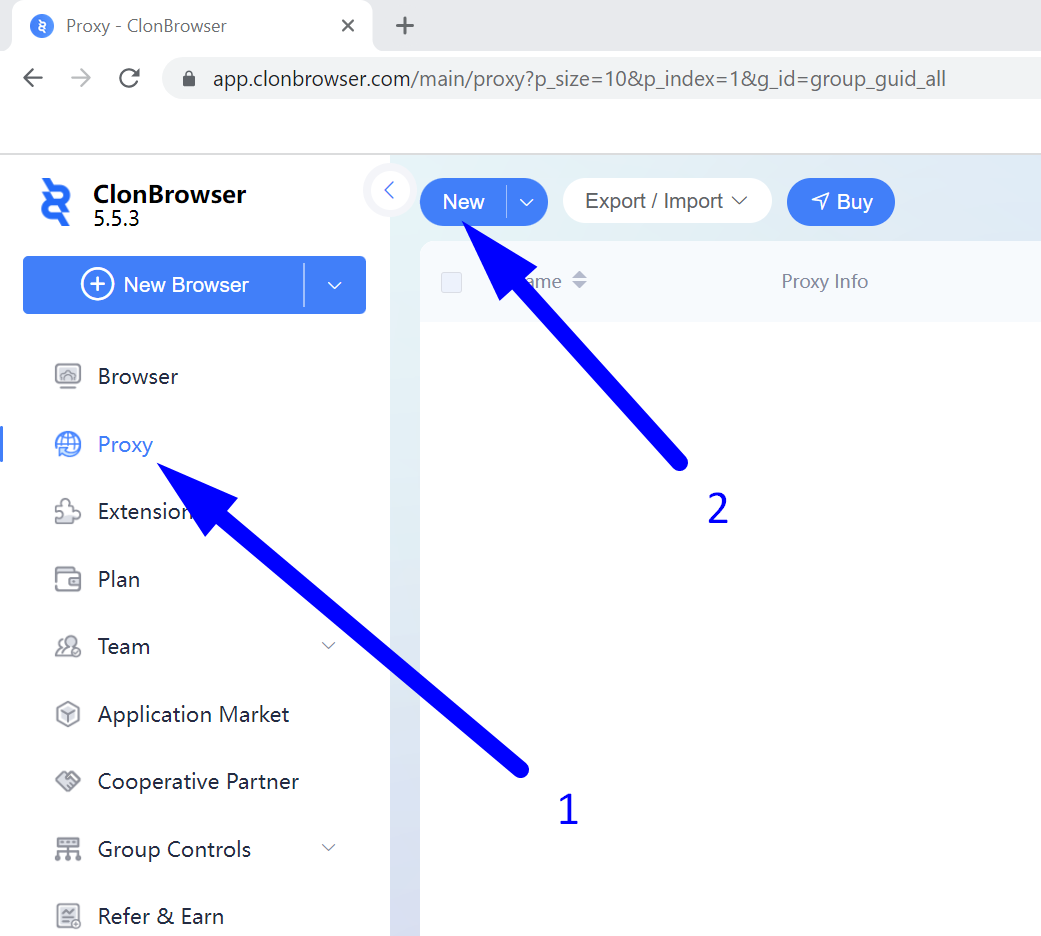
First, click on the “Proxy” menu item on the left side of the screen. Then, click on the “New” button at the top of the screen.
Step 1.1: Setting Up a Single Static Proxy
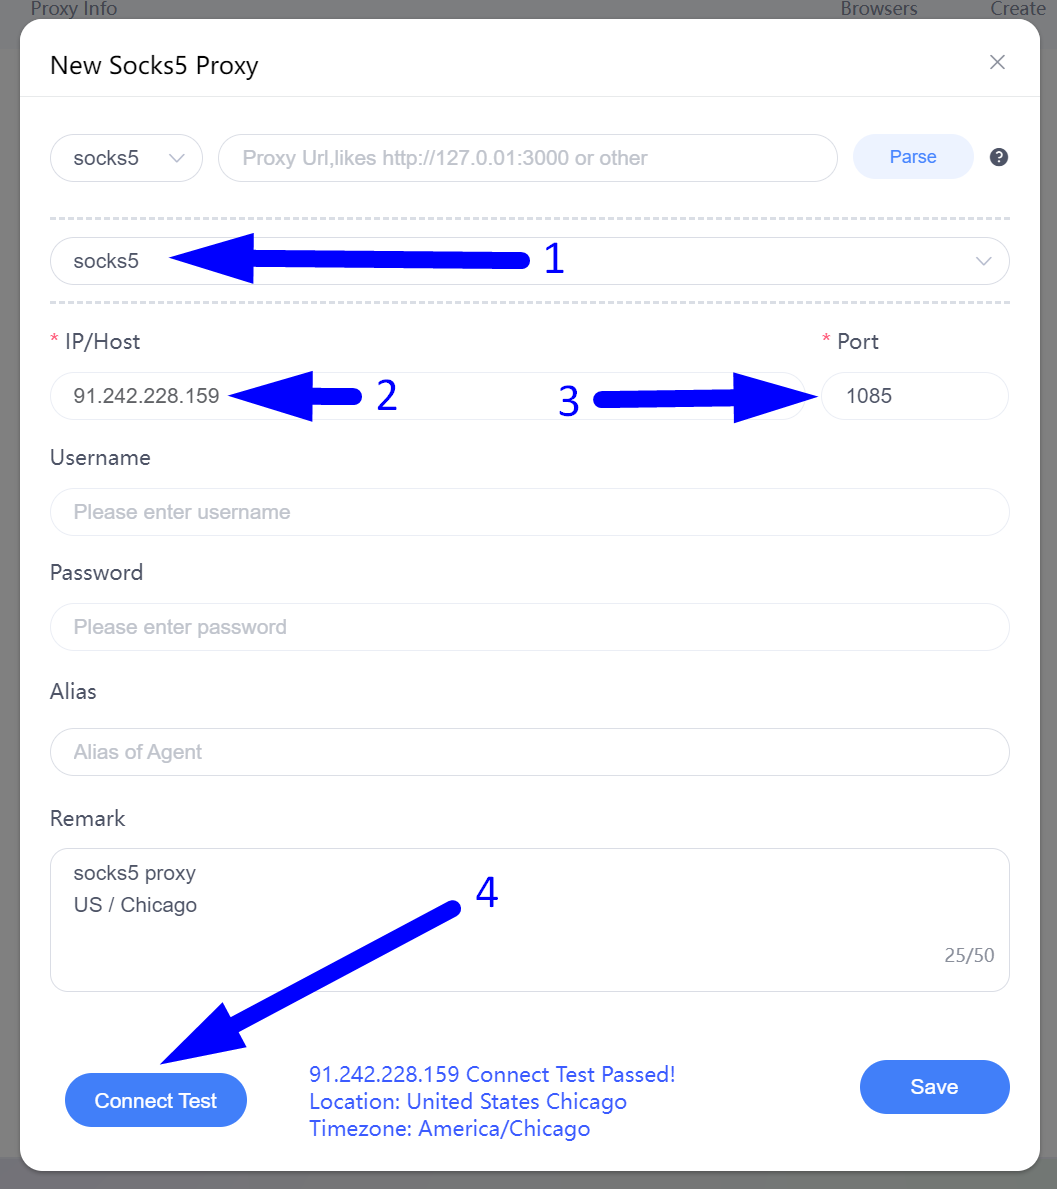
- Select the appropriate proxy protocol. In our case, it’s SOCKS5.
- Enter the IP address of your proxy.
- Enter the required port.
- Check the proxy connection by clicking the “Connect Test” button.
- If ClonBrowser has successfully tested the connection, save your settings by clicking the “Save” button.
Step 1.2: Setting Up Rotating Proxies
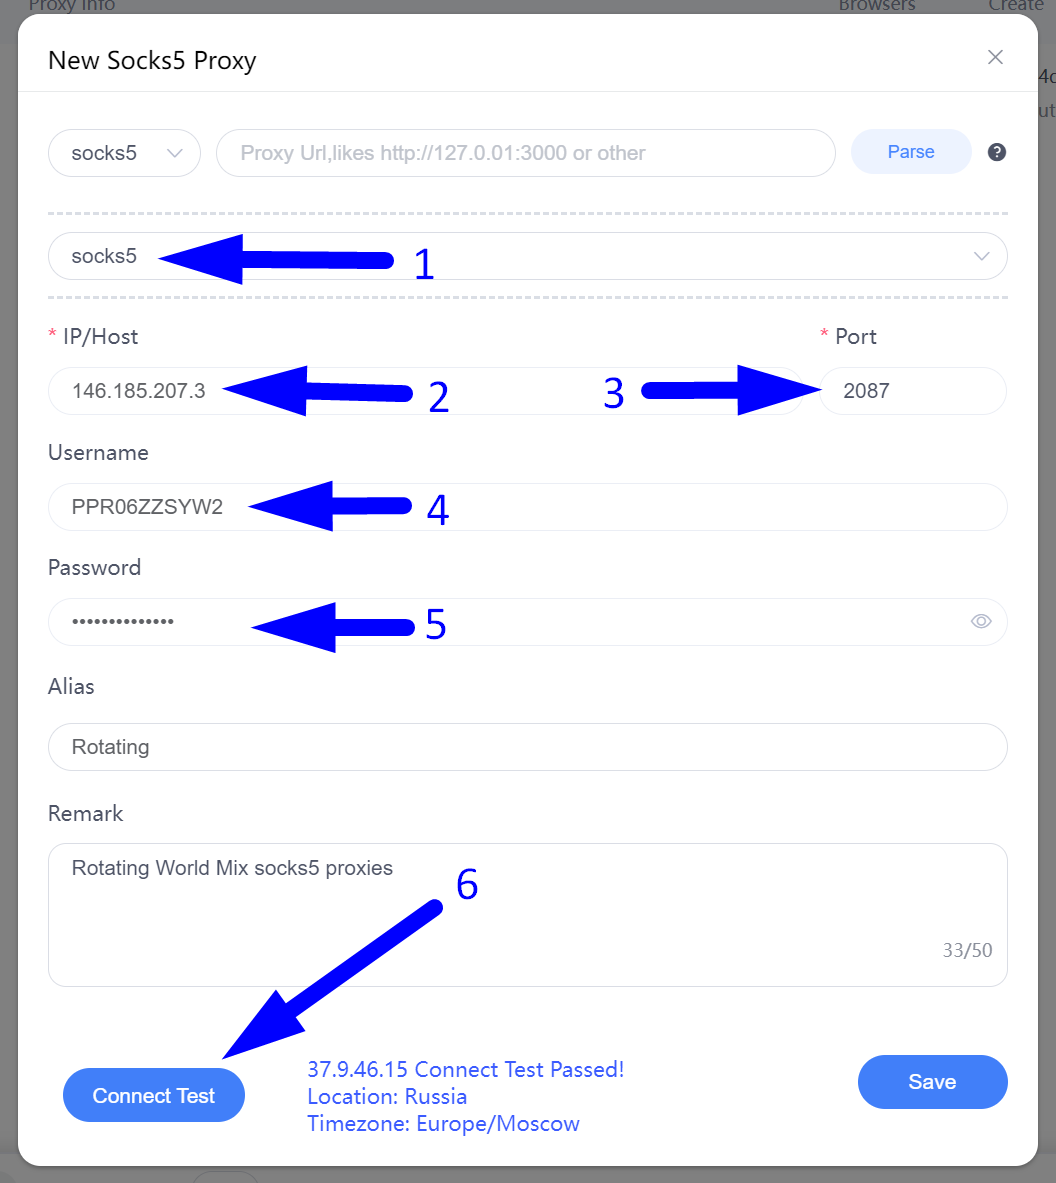
- Select the needed proxy protocol. In our case, it’s SOCKS5 again.
- Enter the IP address of your proxy gateway. For some proxy providers, this may be a gateway that includes letters and looks like “gate.proxyprovider.com” or similar.
- Enter the required port.
- Your Username
- Your Password
- Check the proxy connection by clicking the “Connect Test” button.
- If ClonBrowser has successfully tested the connection, save your settings by clicking the “Save” button.
Step 2: Uploading the Proxy List
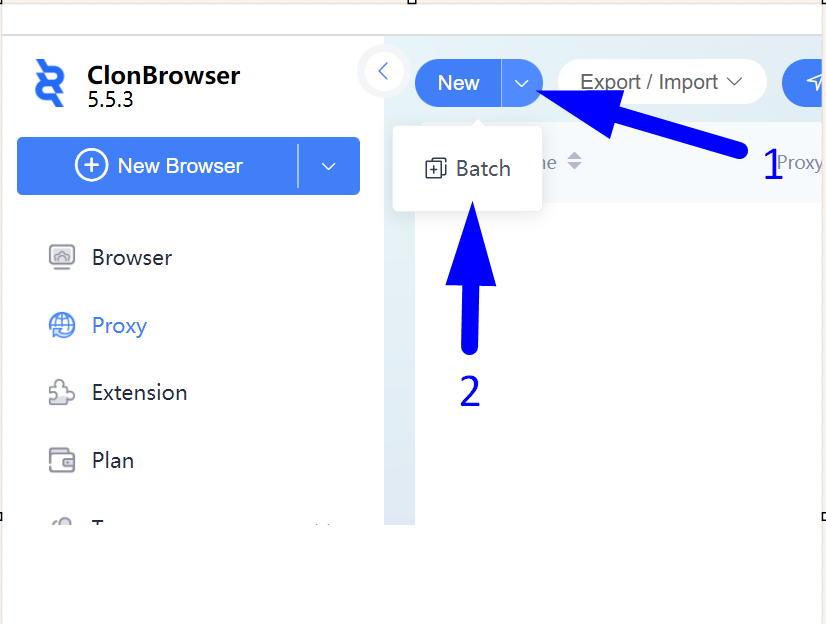
To upload your proxy list, first hover your mouse over the right side of the “New” button and click on the “Batch” submenu item that appears.
Step 2: Paste and Test Your Batch of Proxies
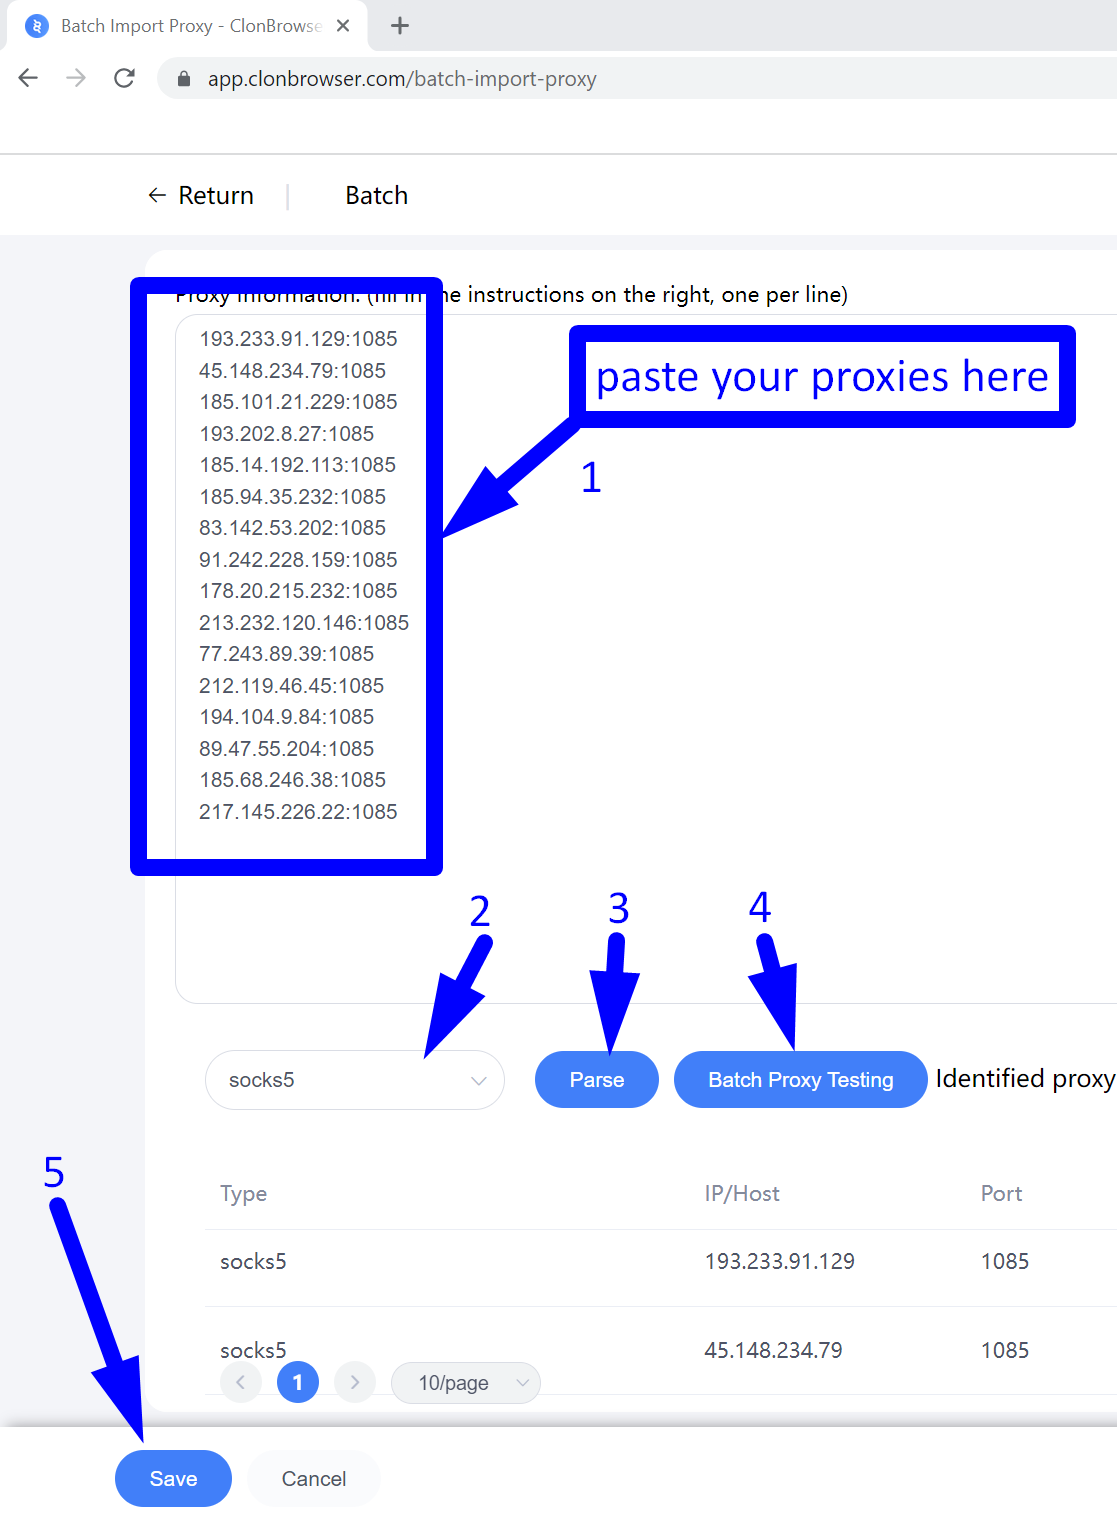
- Copy your list of proxies, including ports, usernames, and passwords (if applicable), in one of the following formats and paste it into the appropriate field.
Supported formats:
[host address]:[port]:[username]:[password]{alias}
[username]:[password]@[host address]:[port]
[protocol]://[host address]:[port]:[username]:[password]{alias}
[protocol]://[username]:[password]@[host address]:[port]
- Select the proxy protocol.
- Click the “Parse” button to allow ClonBrowser to automatically identify the IPs, ports, usernames, and passwords.
- Click on “Batch Proxy Testing” for a bulk check of the proxies.
- If everything is successful, save the proxy list by clicking the “Save” button. If not, double-check the format of the proxy list you have copied and pasted to ensure it is correct.
In the ClonBrowser, you can create multiple different proxy profiles and use each of them for various tasks and situations.


